SSH tunnels can provide secure connections through insecure or untrusted networks and may also be used to securely route through firewalls.
About This Guide
This guide began as a personal document to help me learn and remember how SSH tunnels work and has been several years incubating. If you find errors or think of additional examples that you believe would be helpful, I’d be delighted to know about them.
Terminology
Throughout this guide we use “SSH” to refer to the SSH protocol or the world of SSH things and use ssh to refer to the ssh(1) program itself. “We use ssh and sshd to make SSH connections.” The examples in this tutorial are based on OpenSSH 0.9.8 and later.
As a preview of what’s to come, here is an illustration of a local SSH tunnel that allows client-host to connect to www on port 80, tunneled through tunnel-host over SSH:

This tunnel is created with this shell command:
|
|
Client Host, Tunnel Host
SSH tunnels always have at least two hosts involved1. The first host is the client host, or the host from which we run ssh to define the tunnel. The second host is the tunnel host where the tunnel connections are created. To build an SSH tunnel, the client host must be able to reach the tunnel host via SSH.
Ingress, Egress
In the physical world of plumbing we have pipes, and one end of a pipe is usually as good as the other. With SSH tunnels, the ends of the tunnel are not interchangeable as connections may be initiated at only one end.
We will call the initiating side, entrance, or “listening” end of the tunnel ingress and the terminating or exit end of the tunnel egress.
In ssh syntax, the bind-address:port pair is always the ingress and the host:hostport pair is always the egress. The ingress bind-address is nearly always localhost1 and since this is the default in ssh, it is often omitted and we have only the ingress port.
The tunnel egress can be a little confusing. The SSH portion of the tunnel ends at the host where the final SSH connection is made, though the tunnel host will forward the TCP connection to the specified host:hostport if host is not localhost. TCP traffic past the tunnel host is not secured by SSH1 and any security would be determined by the protocol being tunneled (e.g., HTTPS, IMAPS, etc.), if any.
Using Tunnels
Any service using the tunnel must connect to the ingress port and the connection will come out at the egress host:hostport. To create an SSH tunnel, the tunnel host must be able to reach the egress host:hostport via TCP.
We may find that our way is sometimes blocked by firewall rules or network topologies1. Some complex tunneling involves multiple client hosts, tunnel hosts and ingress/egress pairs.
Syntax
We’ll cover the basics of tunnel syntax here, copied more or less from the ssh(1) man page. We’ll also cover some general ssh options that are often used in SSH tunnels:
-
-Nindicates that we will not be sending any commands over SSH and thatsshshould not openstdinor execute any commands on the tunnel host. -
-Aenables agent forwarding. You should never enable forwarding on hosts you do not trust or otherwise do not wish to use agent forwarding on. See An Illustrated Guide to SSH Agent Fowarding and Using SSH Agent Forwarding for more information1.
Local tunnels
A local tunnel is a tunnel whose ingress is located on the client host. Local tunnels are created with the -L option. The basic syntax of a local tunnel looks like this:
client-host: $ ssh -L port:host:hostport tunnel-host -N
If our client host were named you, we might make a connection to a web server through a bastion host:
you: $ ssh -L 8080:www.example.com:80 bastion-host -N
And to use the tunnel we connect our web client to the tunnel’s ingress at localhost:8080:
|
|
The HTTP request goes through the tunnel host bastion-host; the tunnel egress is at www.example.com:80.
Keep in mind that the SSH portion of the tunnel is between the client host and the tunnel host; traffic between the tunnel host and www.example.com is not protected by SSH.
Remote tunnels
A remote tunnel is a tunnel whose ingress is located on the tunnel host. Remote tunnels are created with the -R option. The basic syntax of a remote tunnel is identical to local tunnel syntax except for the -R option:
client-host: $ ssh -R port:host:hostport tunnel-host -N
If we wanted to make www.example.com:80 available to a remote server via the remote server’s localhost:8080, we might do something like this:
you: $ ssh -R 8080:www.example.com:80 bastion-host -N
The tunnel’s ingress is on bastion-host’s localhost:8080 and the egress points to www.example.com:80:
bastion-host: $ curl http://localhost:8080/some-file.txt
This is a somewhat contrived remote tunnel example, since we might just as easily have made a local tunnel routed from 8080 to port 80 over localhost on the tunnel host itself. A more realistic use for remote tunnels will be given below in the examples.
Dynamic Proxies
The third kind of tunnel we’ll cover is a dynamic proxy. Dynamic SSH proxies forward application connections using the SOCKS4 or SOCKS5 protocol. This means that any application wishing to use a dynamic SSH tunnel must know how to communicate via one of these protocols and be specially configured to do so. Configuring applications to use SOCKS-based protocols is beyond the scope of this guide.
The basic syntax of a dynamic proxy looks like this:
client-host: $ ssh -D port tunnel-host -N
Dynamic proxies are different from local and remote tunnels in that they define only a tunnel ingress on the client host; the tunnel egress is determined dynamically using the SOCKS protocol as the connection passes through the tunnel host.
If we wanted to route all of our web client’s traffic through a remote host via SSH, we might start a dynamic tunnel like this:
you: $ ssh -D 8080 remote-host -N
and then we can make HTTP requests that are now encrypted through to the tunnel host:
you: $ curl -x socks5://localhost:8080 http://www.example.com
Our web client makes a SOCKS connection to the tunnel ingress on you at localhost:8080; ssh uses the SOCKS protocol to determine that the egress should be at www.example.com:80. When the connection arrives at remote-host, ssh forwards the TCP connection to the egress. Any SOCKS compatible application may use this sort of proxy.
This is a powerful method to secure otherwise vulnerable application traffic.
Examples
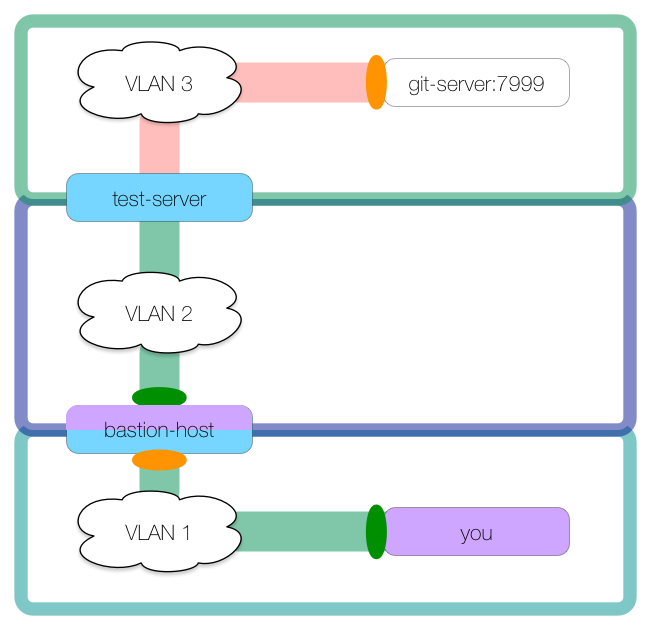
Now that we’ve covered the basic syntax of local, remote, and dynamic tunnels, we’ll show a few illustrated examples of how these might be used. The following image may be used as a reference to understand the colors and symbols in the subsequent examples:

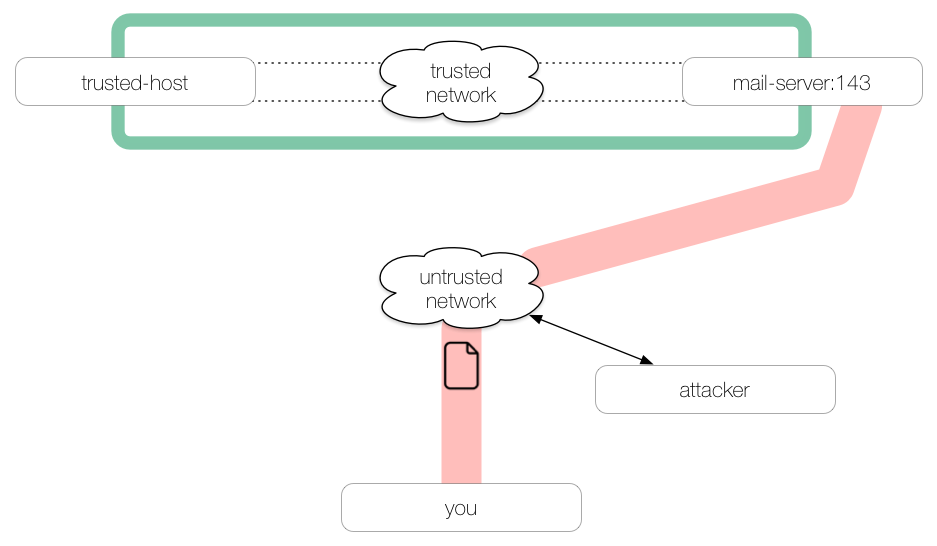
Securing Email
We’re connected to an untrusted network and we want to check our email via an unencrypted IMAP connection1.
If we were to check our email over this untrusted network, we would be sending our credentials in the clear and anyone else on the network could capture our credentials in transit:
If we first make an SSH tunnel to a trusted host, then our traffic passing over the untrusted network will be encrypted all the way through to the trusted host, out of harm’s way:
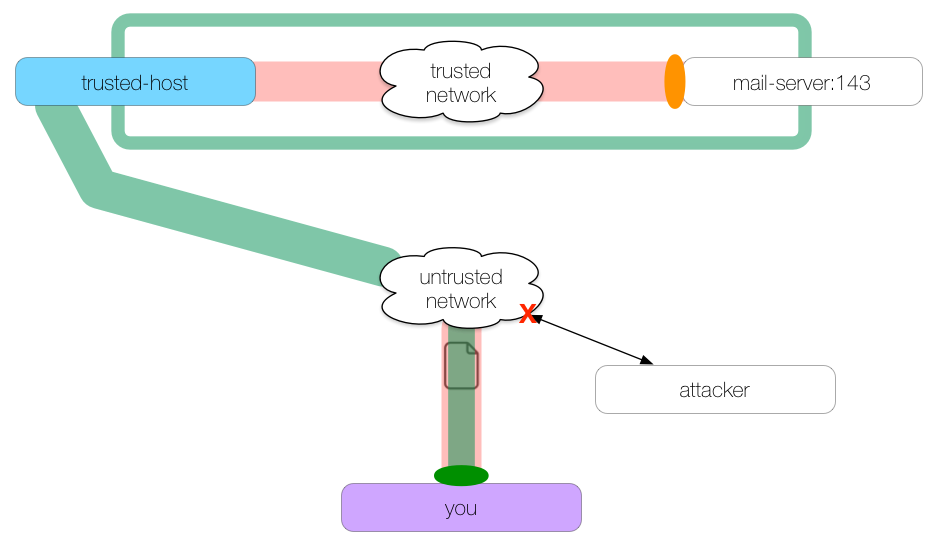
This command creates the SSH tunnel:
you: $ ssh -L 2143:mail-server:143 trusted-host -N
We create a local tunnel (-L) whose ingress is on you at localhost:2143 and whose egress is at mail-server:143. The tunnel is secured via SSH between the client host you and the tunnel host trusted-host.
To use this tunnel, we configure our mail client to use localhost:2143, rather than mail-server:143. The tunnel will forward all traffic it receives on port 2143 to mail-server port 143 via trusted-host.
Note that our network traffic leaving the tunnel egress at trusted-host for mail-server will not be protected by SSH.
Poor Man’s VPN
We have an internal company web server we need to access at
web-serverports 80 and 443. We are outside of the corporate network but the network administrator has configured a bastion host for SSH connections.
We’ll use the bastion host as our tunnel host to forward our web traffic into the trusted network:
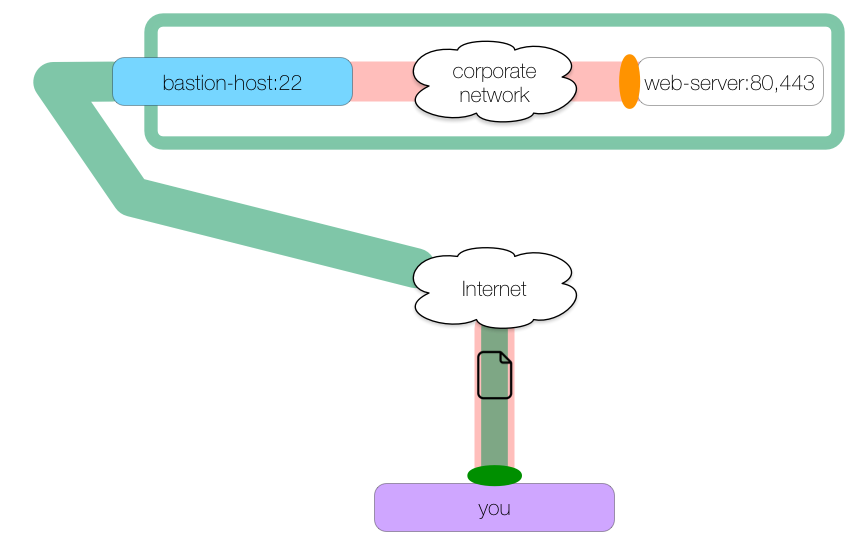
Here is the command to create this kind of tunnel:
you: $ ssh -L 8080:web-server:80 -L 8443:web-server:443 bastion-host -N
We create one local tunnel whose ingress is on localhost:8080 and whose egress is at web-server:80. We create a second local tunnel whose ingress is at localhost:8443 and whose egress is at web-server:443. Both tunnels pass through bastion-host.
We can make HTTP and HTTPS requests to localhost ports 8080 and 8443 which will be forwarded to web-server ports 80 and 443 respectively:
you: $ curl https://localhost:8443/secure.txt
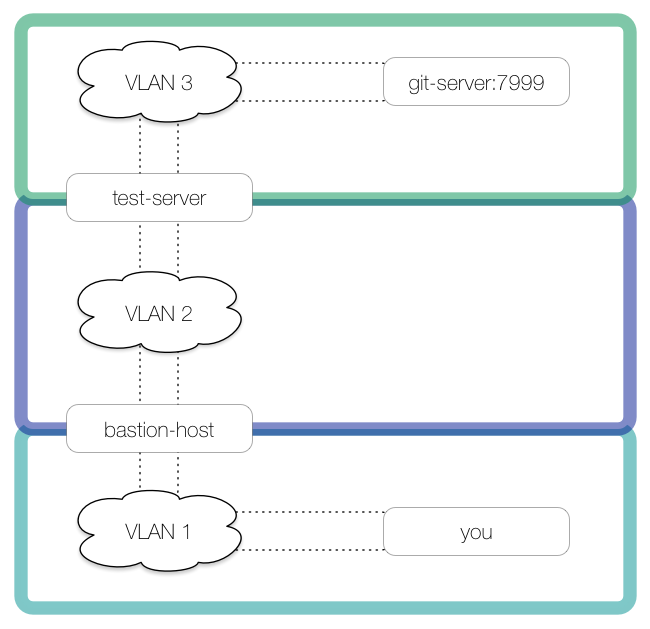
Double Tunnel
This example illustrates a double tunnel to get around two firewalls.
We are connected to
VLAN 1and want to check out a Git repository inVLAN 3.
The bastion host spanning
VLAN 1andVLAN 2cannot access to the Git server, but a test server that spansVLAN 2andVLAN 3can. The Git service listens on port 7999.
Here is a picture of our network:
We need to first tunnel into VLAN 2, using bastion-host as the first tunnel host. We create a local tunnel to bastion-host with an ingress on you’s localhost:7999 and an egress on bastion-host’s localhost:2999:
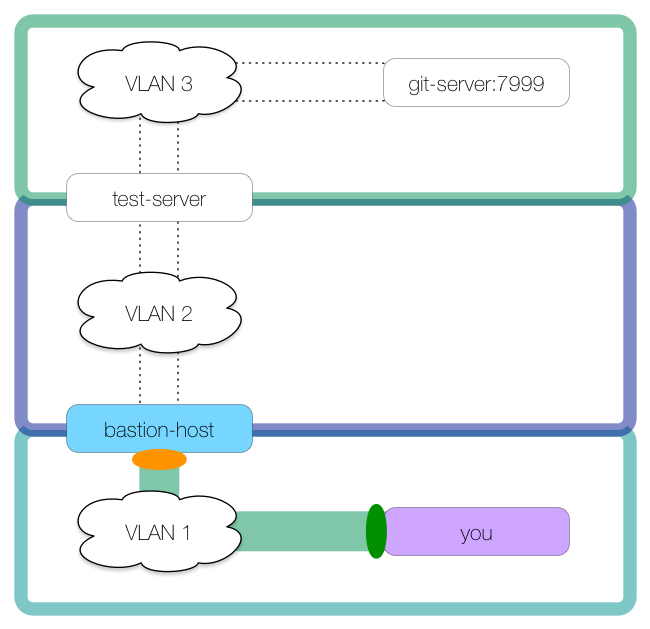
This command creates the tunnel:
you: $ ssh -L 7999:localhost:2999 bastion-host
Notice how we did not use -N with this tunnel. The reason is that we can use this SSH connection to make our second tunnel, using test-server for the tunnel host:
This second tunnel is created from bastion-host:
bastion-host: $ ssh -L 2999:git-server:7999 test-server -N
In this second tunnel, bastion-host is acting as the client host with ingress on bastion-host’s localhost:2999. The connection goes through the tunnel host test-server with egress at git-server:7999.
This double tunnel is possible because bastion-host is hosting the first tunnel’s egress at localhost:2999 and the second tunnel’s ingress at localhost:2999, thereby linking the two tunnels.
Chaining tunnels through multi-homed hosts can get you far inside of networks.
Now we can connect to git-server through the tunnels:
you: $ git clone ssh://git@localhost:7999/some-repo.git
For existing repos, we can add a new remote:
you: $ git remote add tunnel ssh://git@localhost:7999/some-repo.git
you: $ git pull tunnel master
Local HTTP Proxy
Remote tunnels are less common than local tunnels, but are no less useful in the right situation. In this example we will use a remote tunnel to create a connection back to our client host which will be acting as an HTTP proxy.
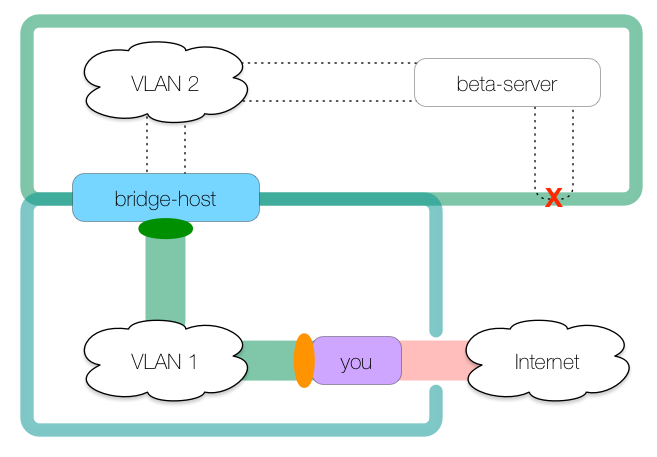
We need to fetch a remote file via HTTP from our beta server, but the beta server connected to
VLAN 2does not have access to the public internet, nor can it connect to other hosts inVLAN 2. The only access permitted to the beta server is through a bridge host that sits onVLAN 1andVLAN 2.
Our own host (
you) may connect to the bridge host as well as the public internet.
Here is the network:
Our first step is to run an HTTP proxy on you. Selection and installation of an HTTP proxy is outside of the scope of this document, but for the sake of this illustration, we’ll use tinyproxy which is freely available and requires little to no configuration. We’ll assume our tinyproxy is configured to listen on all interfaces (including localhost) at port 8888 and we’ll run it in the foreground so we don’t forget about it1:
you: $ tinyproxy -d
Now we have a means for hosts connected to you:8888 to access the public internet:
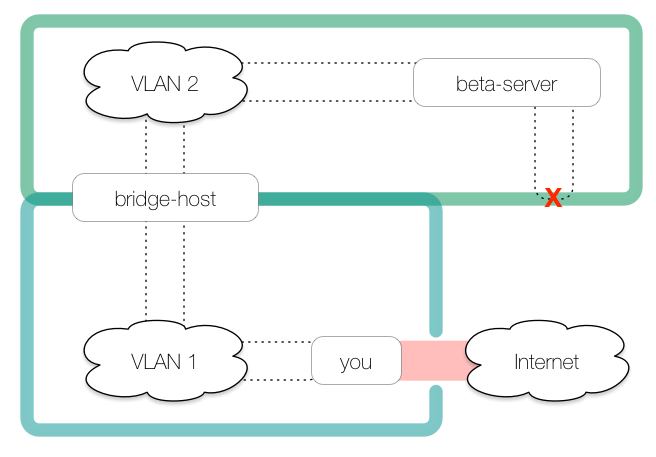
However, because beta-server cannot access you directly to access the HTTP proxy, we need to create a tunnel from the bridge host back to us:
This commands creates the tunnel:
you: $ ssh -R 8080:localhost:8888 bridge-host
This creates a remote tunnel whose ingress is on bridge-host’s localhost:8080 and whose egress is at you’s localhost:8888, which is where our tinyproxy daemon is listening.
Pay close attention to where the ingress and egress are: they are in opposite positions to where they are in a local (-L) tunnel, meaning the tunnel is entered on the tunnel host rather than on the client host. This is the definition of a remote tunnel.
With this tunnel as it is, we could access the public internet from the bridge host like so:
bridge: $ curl -x http://localhost:8080 http://www.example.com
While this is neat, we’re only halfway done. As we did in the double local tunnel, we’ll use this SSH connection to make our second remote tunnel:
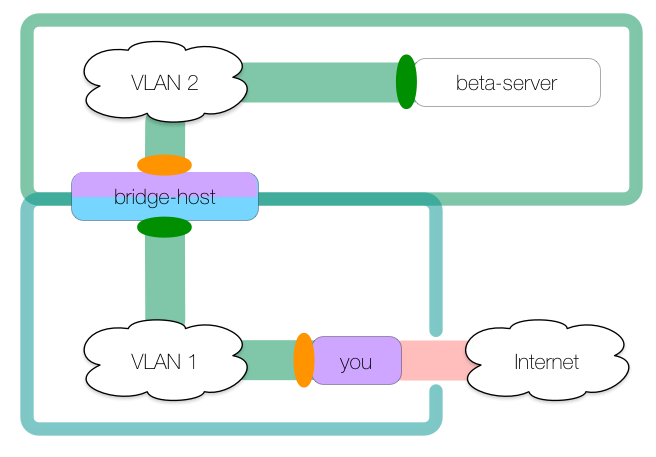
To create this tunnel:
you: $ ssh -R 8080:localhost:8888 bridge-host
bridge: $ ssh -R 9999:localhost:8080 beta-server -N
The second remote tunnel has ingress at beta-server’s localhost:9999 and egress is at bridge-host’s localhost:8080, which is where the first tunnel’s ingress is. The tunnels join on bridge-host so that HTTP connections made on beta-server:9999 (the effective ingress) are forwarded to tinyproxy running on you:8888 (the effective egress):
beta: $ curl -x http://localhost:9999 https://www.example.com/file.tar.gz
Troubleshooting
As mentioned at the beginning of this document, before you can create an SSH tunnel, the client host must be able to connect to the tunnel host via SSH. This is the first thing you should test when troubleshooting.
If that works properly, you might check to see if firewall rules prohibit opening any of the ports you are trying to forward. This may require a little experimentation or co-opting of existing open ports.
Further, many SSH installations are customized. Some administrators require public key authentication, others require password authentication1. Is agent forwarding permitted? Prohibited? Are you using the same keypair for every connection or do some connections require one keypair and others another?
Many of these configuration differences can be put into ~/.ssh/config files on the hosts you use as clients and tunnels, allowing you to use aliases and simplifying your SSH connections.
Try ssh in verbose mode; did you know ssh accepts up to three -v flags? Finally, there is no substitute for the manual. OpenSSH and other SSH variants have extensive documentation that’s worth a gander.
Caveats
SSH tunnels can provide strong security for data in transit and can compensate for baroque network topologies. SSH tunnels can also be used to circumvent reasonable security measures designed to prevent certain kinds of network access.
Knowledge is a two-edged sword: I hope that you will use this information to do good, not evil. I neither encourage nor condone using SSH tunnels to bypass your network administrator’s intentions to protect access to specific hosts on the network.
Be wise, be good!
Last modified on 2015-08-16